Where is Volume Mixer Windows 11: A Practical Guide
Learn where the Volume Mixer lives in Windows 11 and how to adjust per-app volume. A practical, step-by-step guide for home cooks, bar enthusiasts, and audio hobbyists seeking precise control.

You’ll locate and use the Volume Mixer in Windows 11 to control per-app audio. Access it from the taskbar speaker icon by selecting Open Volume Mixer, or go to Settings > System > Sound > App volume and device preferences for finer control. This quick path covers both routes and highlights when per-app volume matters.
What the Volume Mixer is and why it matters
If you’ve ever found yourself juggling the sound from a video conference, a music app, and a system notification at the same time, you know why Volume Mixer matters. The Volume Mixer in Windows 11 lets you control overall system volume and adjust the loudness of individual applications. It’s the key tool for tailoring audio when you stream, cook with a video recipe, or jam to a playlist while using a voice chat. According to Mixer Accessories, understanding where to locate the Volume Mixer is a key first step in mastering audio control on Windows 11. In this guide, we’ll walk through where to find this mixer, how to use app-specific sliders, and how to troubleshoot common issues. The goal is to give you practical, repeatable steps you can rely on whenever your audio feels off. If you’re wondering where is volume mixer windows 11, the answer is accessible from the taskbar speaker icon or Settings. The per-app settings work alongside the system volume and audio device settings, so you can keep notifications quiet while music or games stay loud. This separation is especially helpful for multitasking in a kitchen, workshop, or home studio.
From a practical standpoint, mastering the Volume Mixer means you can protect your listening experience across activities—recipe videos, podcasts, coffee-house playlists, gaming, or virtual meetings—without muting everything at once. Keep in mind that per-app volume is saved per user profile, so if you share a PC with others, you’ll want to set defaults for each account. This approach ensures predictable audio behavior, reducing the time you spend chasing a good mix. The Mixer Accessories team emphasizes consistency and repeatability as the core benefits of using per-app volume controls, and this guide follows that mindset with clear steps you can reproduce.
Access paths to the Volume Mixer in Windows 11
There are two primary ways to reach Volume Mixer in Windows 11. The fastest route is via the taskbar: locate the speaker icon on the far right, click it, and choose Open Volume Mixer from the contextual menu. If you don’t see the option, it may be hidden behind quick actions; click the chevron to expand more options. The second route is through Settings: open the Start menu, go to Settings, then System, and finally Sound. Within that screen you’ll find App volume and device preferences, which opens a dedicated panel for adjusting per-app sliders. Both paths give you access to the same per-app controls, but the taskbar route is quicker for everyday tweaks, while Settings provides a more detailed, centralized location for advanced users.
From a usability perspective, Windows 11’s redesigned sound systems emphasize quick, task-based access to audio levels. If you rely on multiple apps for work and entertainment, knowing both routes helps you tailor your mix on the fly. If an app isn’t showing up in Volume Mixer, ensure that the app is actively producing audio; Windows only renders sliders for apps that have recently played sound. This detail helps you diagnose why a particular app doesn’t appear in the list at a given moment.
Quick route: Volume icon context menu
The quickest way to tweak audio is through the system tray volume control. Right-click the speaker icon, then select Open Volume Mixer. This path brings up a vertical list of running apps with individual sliders. You can drag sliders up or down to balance levels and quickly mute a specific app by clicking the speaker icon next to its slider. This method is ideal when you’re juggling a video call while adjusting music playback. Remember: changes take effect almost instantly, so you can test immediately by playing audio from the relevant app.
Pro tip: If you want to keep a consistent workflow, pin Volume Mixer or the general volume control to your taskbar. Quick access reduces the friction of frequent adjustments during live tasks like cooking shows, bar service demos, or streaming sessions.
Navigating to App volume and device preferences in Settings
For more granular control, Settings > System > Sound > App volume and device preferences offers a broader view of audio for every app. Here you’ll see a list of currently running apps with per-app sliders. If an app isn’t listed, launch the app and play audio to force Windows to register it, then return to this screen to adjust. You can also set default output and input devices per app if you frequently switch between headphones, speakers, or Bluetooth devices. This is particularly helpful in environments with shifting audio hardware, such as a small kitchen with ambient music and a connected microphone for calls.
A common setup pattern is to lower notification sounds while keeping the music or video at a comfortable level. If you rely on particular headsets or speakers, you can assign them to specific apps to prevent driver conflicts and to ensure consistent audio when you switch between devices.
How to adjust per-app volume sliders effectively
Within Volume Mixer, drag each per-app slider to the desired level. Use the meter beside the slider as a visual cue: if the meter peaks red, you’re approaching distortion. For quiet tasks like video conferencing, you may want to reduce the app volume a bit while leaving your music app at a comfortable level. Don’t forget to test with different content—speech-heavy apps may require more headroom than music apps. If you notice volume fluctuations, consider updating device drivers or checking for Windows updates that improve sound handling. In professional setups, some users pair Volume Mixer with a dedicated audio interface, using the mixer to tame live inputs while the system handles playback from other apps.
If you use an external audio device, ensure it’s selected as the default output, then fine-tune per-app sliders to taste. Remember that having the correct input and output devices is essential for reliable volume management, especially if you’re recording or streaming while cooking or giving a live demonstration.
Troubleshooting common issues with Volume Mixer
If app sliders don’t appear, verify that the app has recently produced audio. Close and reopen the app, then return to Volume Mixer to check for the slider. If Windows doesn’t reflect volume changes, try a quick restart of the Audio service, or sign out and back in to refresh the sound subsystem. Make sure Windows 11 is up to date, as updates often fix a range of audio quirks. If you still encounter problems, test with a different user profile to rule out profile-specific settings. Finally, ensure the correct audio device is selected and not muted at the hardware level.
For accessibility considerations, use Windows’ built-in narration or magnifier to confirm that the sliders respond visually, which helps ensure you’re adjusting the right controls during a live session.
Real-world use cases: gaming, music production, and video calls
In gaming, you’ll typically want game audio loud enough to hear important cues while keeping chat volume steady. Use Volume Mixer to keep the game sound high but reduce chat alerts. For music lovers and producers, you can boost the music app while keeping other apps at a lower level to avoid masking vocal tracks in tutorials or streaming sessions. In video calls, lower other app volumes to prevent interruptions or background noise from creeping into the microphone path. For home cooks following a recipe video or a live streaming cooking show, per-app control ensures the recipe narration remains audible without turning down the entire system volume.
These scenarios highlight the versatility of per-app volume in Windows 11. The Volume Mixer isn’t just for obvious use cases; it helps you create a tailored audio environment that supports focus, collaboration, and enjoyment across different activities. Regularly revisiting app levels after updates or new app installations will help maintain your preferred mix.
Pro tips for efficient volume management
- Pro tip: Pin the Volume Mixer to your taskbar or Start menu for faster access during live tasks.
- Pro tip: Use App volume and device preferences to assign a specific output device to a critical app (e.g., streaming software on your headphones while system sounds play on speakers).
- Warning: If you’re troubleshooting, avoid excessive adjustments that could cause distortions in real-time audio; small changes often yield better results.
- Note: If an app isn’t listed, start playback in that app, then revisit Volume Mixer to capture the new entry.
- Pro tip: Create a quick reference note of your most common app-volume settings for future sessions.
Final thoughts: testing and documenting your settings for future sessions
Once you’ve dialed in the right balance, document your standard app volumes and output device assignments. A simple checklist can prevent drift over time when software updates or new apps are installed. When you’re ready, save a short note describing the current mix and where you’ve configured each slider. If you share the device with others, consider creating separate profiles to avoid cross-user volume conflicts. Keeping a log will save time during future tasks like streaming, teaching, or bar demonstrations, especially in environments where quick, repeatable audio setups matter.
Tools & Materials
- Windows 11 PC(A functioning Windows 11 machine with recent updates installed.)
- Mouse or trackpad(For precise clicking of the volume icons and sliders.)
- Headphones or speakers(To test and compare audio outputs accurately.)
- External audio device (optional)(If you use a dedicated audio interface or mixer.)
- Screenshot or note-taking app (optional)(Helpful for documenting settings for future sessions.)
Steps
Estimated time: Total time: 8-12 minutes
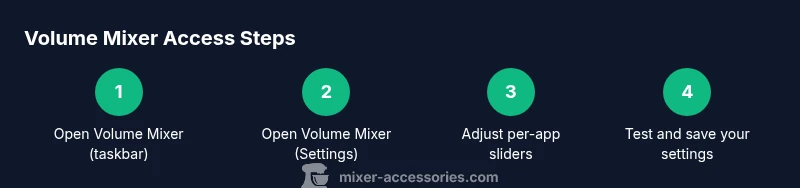
- 1
Open Volume Mixer from the taskbar
Right-click the speaker icon in the Windows 11 taskbar. In the context menu, choose Open Volume Mixer. This action displays per-app sliders for currently running applications and lets you adjust the overall system volume at the top. The quick access path is ideal for fast tweaks during live tasks.
Tip: If you don’t see Open Volume Mixer, expand the quick actions area or click the chevron to reveal more options. - 2
Open Volume Mixer from Settings
Open Settings > System > Sound, then select App volume and device preferences. This path provides a centralized list of apps with individual sliders and lets you set default output/input devices per app.
Tip: Use this route when you need to adjust multiple apps in one place or set device-specific preferences. - 3
Adjust per-app sliders
Drag each app’s slider up or down to balance loudness. Monitor the meters as you play audio to avoid clipping and distortion. If an app isn’t listed, start playing audio in that app to populate it in the list.
Tip: Start with the most used apps and then fine-tune after a quick test run. - 4
Set default devices per app
In App volume and device preferences, pick the output device (speakers, headphones, Bluetooth) for apps that require a specific path. This helps prevent mismatches when devices change during a task.
Tip: If you frequently switch devices, consider creating a routine to re-check device assignments after reconnecting. - 5
Test, adjust, verify
Play audio from each app to verify the new balance. Make additional tweaks as needed until all essential sounds are comfortable. When satisfied, keep the window open for quick future access.
Tip: Use a mix of voice, music, and system sounds to test the balance comprehensively. - 6
Close the tool or pin for speed
Close Volume Mixer when finished, or pin the icon to the taskbar for faster access in the future. Consistent use builds muscle memory for rapid adjustments during live tasks.
Tip: Pinning reduces time spent navigating menus during important moments.
Your Questions Answered
Where is Volume Mixer in Windows 11?
Volume Mixer can be opened from the taskbar by clicking the speaker icon and selecting Open Volume Mixer, or via Settings > System > Sound > App volume and device preferences for per-app control.
Open Volume Mixer from the taskbar or Settings to adjust per-app audio.
Can I adjust volume for individual apps in Windows 11?
Yes. The Volume Mixer and App volume and device preferences let you set separate volume levels for each running app.
Yes—use the per-app sliders to balance each program’s sound.
Why don’t I see some apps in Volume Mixer?
Apps only appear when they are actively producing audio. Start the app’s audio, then check Volume Mixer again.
Make sure the app is playing sound to appear in the mixer.
Is Volume Mixer available in all Windows 11 editions?
Per-app volume controls are part of the standard Windows 11 sound settings. If you don’t see them, install updates or restart the audio service.
Yes, with updates if needed.
Can I mute a single app without muting all sound?
Yes. Use the per-app slider or click the mute icon next to the app’s slider in Volume Mixer.
Absolutely—mute the app you don’t want to hear.
Watch Video
Top Takeaways
- Open Volume Mixer via taskbar or Settings for per-app control.
- Per-app volume is separate from system volume for precise balancing.
- Test audio across apps to ensure consistent levels.
- Update Windows and drivers if app sliders disappear or behave oddly.