Why is Mixer Tap Leaking? A Practical Troubleshooting Guide
Urgent, practical guide to diagnose and fix a leaking mixer tap. Learn common causes, DIY steps, safety tips, and when to call a professional.

Most mixer-tap leaks come from worn cartridges, seals, or washers, or from loose connections. Start by shutting off the water, identify the drip origin, and replace the worn part. If the drip persists after reseating components, seek professional help before disassembling further.
Why leaks happen: common culprits
Water leaks from a mixer tap are rarely mysterious. In most homes, the culprit is wear or damage to the internal components. According to Mixer Accessories, a lot of leaks stem from worn cartridge seals, degraded rubber washers, or corroded O-rings. The physical design of modern taps means tiny gaps can become drip points if regular maintenance is neglected. Pressure, mineral buildup from hard water, and repeated temperature changes hasten wear. When a tap drips, it signals that the sealing surface is compromised, not that your entire plumbing system is failing. Start by confirming the origin of the drip, because the location (spout, base, or handle) guides the repair path. If you ignore the leak, mineral deposits can clog the valve seat and accelerate wear on the cartridge, making fixes harder later on. This is a practical issue you can address with a clear plan and the right parts.
Quick diagnostic you can do before disassembly
Before taking things apart, observe carefully where the water is leaking from. A leak at the handle usually points to worn seals or a loose retaining nut, while a drip around the base suggests a worn O-ring or a failing cartridge. Confirm whether the leak happens with hot, cold, or both feeds. Shut off both the hot and cold water supplies at the under-sink valves and relieve pressure by running the tap for a few seconds. Use a dry tissue or a paper towel to trace moisture back to its source. Recording the drip rate or keeping a small bucket beneath the outlet can help you gauge the severity. If the leak disappears after turning off water, you know the problem is confined to the faucet assembly rather than the pipes.
Check the water supply and fittings
Inspect all connections under the sink: supply lines, compression fittings, and mounting nuts. Look for loose connectors, crusted mineral deposits, or damaged seals where hoses meet the faucet body. Tighten any loose fittings by hand first, then with a suitable wrench, being careful not to overtighten and damage the fittings. If you notice corrosion or fraying on supply hoses, replace them. Also check the aerator at the outlet; a clogged aerator can cause backpressure that pushes water back into the valve body. Addressing these simple checks often resolves minor leaks without disassembly.
Internal components: washers, O-rings, cartridges
The most common wear points are the rubber washers and O-rings around the valve stem, and the cartridge itself in cartridge-type taps. Over time, washers compress, O-rings crack, and cartridge seals degrade, allowing water to seep past the valve. If you own a ceramic-disc faucet, deep-seated wear on the disc can produce a persistent drip. Inspect the cartridge or stem for signs of wear, cracks, or mineral buildup. If you see flaking rubber, a crack in the plastic cartridge body, or obvious wear on the metal seats, replacements are warranted. Replacing these parts usually restores a watertight seal and reduces dripping.
How to confirm the exact leak source
To identify the precise origin, retry the test with water off, then reintroduce water gradually while watching for fresh moisture. If water appears at the handle, focus on the bonnet nut and escutcheon; if it appears at the base, the O-ring or cartridge seal is suspect; if it drips from the spout, it’s often the cartridge seat or a worn stem seal. Use a flashlight and mirror to inspect tight spaces. After identifying the source, note the exact model and cartridge type to ensure you purchase the correct replacement parts. If you’re unsure about which cartridge you have, remove the handle carefully and compare the cartridge shape to available replacement kits. Safety first: keep your tools organized and avoid abrupt movements in tight spaces.
DIY steps vs professional help
Simple leaks from washers or basic O-rings can often be fixed with a DIY approach using a replacement washer kit or a cartridge kit. If you have a modern single-handle faucet, replacing the cartridge typically stops the leak and restores smooth action. However, some taps are part of a larger fixture or built into a kitchen island or a shower mixer; those cases may involve more complex calking, integrated assemblies, or warranty concerns. If you notice corrosion, stubborn mineral buildup, or if disassembly risks damaging the finish, it’s wise to contact a professional plumber. For ambiguous leaks or if the faucet is still under warranty, professional service is the safer path. Remember: working with live water lines carries risk—shut off the water and ventilate the space to avoid slips.
Maintenance to prevent future leaks
Prevention is better than repair when it comes to mixer taps. Regularly clean the aerator and the cartridge area to remove mineral buildup. Periodically inspect hose connections and mounting nuts for looseness. If you replace a cartridge, use the exact model or a compatible brand-specific kit to ensure a proper seal. Lubricating seals with plumber-grade silicone grease (where appropriate) can reduce wear and tear on O-rings. Finally, adopt a simple maintenance routine: run hot and cold water for a few seconds weekly to keep seals from sticking and to detect leaks early while they’re easy to fix.
Key takeaway: A leaking mixer tap is usually fixable with common parts and careful inspection; start with simple checks, identify the source, and decide between DIY or professional help based on the faucet type and your comfort level.
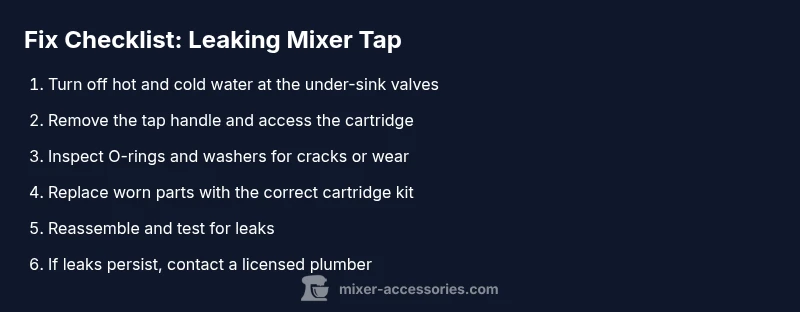
Steps
Estimated time: 45-60 minutes
- 1
Shut off water and relieve pressure
Locate the under-sink shut-off valves for hot and cold water and close them. Open the faucet to relieve any remaining pressure and drain the line. This prevents water spray and protects components during disassembly.
Tip: Keep a towel handy to catch residual water. - 2
Identify the leak source
Carefully observe where the water is coming from while the faucet is still, then proceed to remove the handle and escutcheon if the source appears internal. Use a flashlight to inspect the bonnet nut and cartridge area for moisture.
Tip: Take photos before disassembly to reference replacements. - 3
Disassemble the faucet handle
Remove the handle by loosening the set screw or retaining nut. Remove the decorative cap and unscrew the bonnet nut to access the cartridge or stem. Keep track of small parts and order the correct replacement kit.
Tip: Do not scratch the faucet head with tools; protect finishes with a cloth. - 4
Inspect and replace worn parts
Check the cartridge, O-rings, and washers for wear, cracks, or mineral buildup. Replace with an equivalent cartridge kit or washer set. If the seat or stem is damaged, replace it to restore a watertight seal.
Tip: Use file to remove mineral debris only; avoid abrasive cleaners on seals. - 5
Reassemble and test
Reassemble the faucet in reverse order, ensuring all seals are seated properly. Turn the water back on slowly and check for leaks. If drips persist, tighten gently or try another replacement part.
Tip: Test with both hot and cold settings to confirm a complete seal. - 6
Know when to call a pro
If the faucet is integrated, if you see corrosion, or if your replacement parts do not stop the leak, stop and call a licensed plumber. A pro can assess hidden damage and ensure warranty coverage.
Tip: Document the model and part numbers for faster service.
Diagnosis: Drip or continuous leak from mixer tap when the faucet is turned off
Possible Causes
- highWorn cartridge or valve stem
- mediumCracked or worn O-ring/washer
- lowLoose supply connections or fittings
Fixes
- easyReplace the cartridge or valve stem to restore sealing surface
- easyReplace O-rings or washers and reseat seals
- easyTighten or replace loose supply lines and fittings
- mediumCall a plumber for integrated fixtures or corrosion-related leaks
Your Questions Answered
What causes a mixer tap to leak?
Leaks are usually due to worn cartridges, o-rings, or washers, plus loose connections. Mineral buildup can also force seepage. Identifying the exact source is key before replacing parts.
Leaks usually come from worn seals, a bad cartridge, or loose fittings. Finding the source is the first step before replacements.
Can a leaking tap cause water damage?
Yes. Persistent leaks can lead to water damage in cabinets and floors, especially in humid environments. Fixing leaks promptly reduces the risk of mold and structural damage.
Yes—persistent leaks can cause water damage and mold if not fixed promptly.
Do I need to replace the cartridge to fix a leak?
If the cartridge is worn or damaged, replacing it is a common and effective fix. Ensure you match the model to get a proper seal.
If the cartridge is worn, replacing it is often the best fix. Make sure you match the model.
Is it safe to DIY fix a mixer tap?
DIY can be safe for basic leaks with proper tools and parts. Always shut off water first and wear eye protection. If you’re unsure about the faucet type, consult a professional.
DIY is fine for simple leaks, just shut off water and use proper parts. If unsure, call a pro.
When should I call a plumber?
Call a plumber if the fixture is old, the leak persists after parts replacement, or you suspect hidden pipe damage or warranty issues.
Call a plumber if the leak continues after parts replacement or if you suspect hidden damage.
Can mineral buildup cause a leak even after parts are replaced?
Yes. Hard water minerals can redeposit around seals and seating areas. Clean the area and ensure seals are properly seated during reassembly.
Minerals can redeposit around seals; clean and reseat parts properly when you reassemble.
Watch Video
Top Takeaways
- Identify leak origin before disassembly
- Worn cartridge or O-rings are the most common causes
- DIY fixes are possible for simple leaks with the right parts
- Call a professional for integrated fixtures or persistent leaks